OSX docker のセットアップ
今更、書くことでもないが。 基本的に公式ドキュメント見ればいいと思う。
VertualBoxが必要なので、予めインストールしておくとよい。
インストール
インストールは homebrew でサックっと行う。
brew update
brew install boot2docker
OS起動時に起動設定するので、書いてある通り実行する。
To have launchd start boot2docker at login:
    ln -sfv /usr/local/opt/boot2docker/*.plist ~/Library/LaunchAgents
Then to load boot2docker now:
    launchctl load ~/Library/LaunchAgents/homebrew.mxcl.boot2docker.plist
環境変数の設定
今までは
export DOCKER_HOST=tcp://192.168.59.103:2376
export DOCKER_CERT_PATH=${HOME}/.boot2docker/certs/boot2docker-vm
export DOCKER_TLS_VERIFY=1
を書いてたけど、
shellinitコマンドができてから、
eval "$(boot2docker shellinit)"
でよくなったみたい。
これだと、毎回シェル起動するたびに Writing ~/.boot2docker/certs/boot2docker-vm/ca.pem みたいに出てきてうざいので、少しアレンジして以下の行をrcなどに追加するとよい。
eval "$(boot2docker shellinit 2> /dev/null)"
ただ、毎回Writing~も実行されてるっぽくて気持ち悪い場合は、最初のexport形式に戻すことになる。
実験。
$ time (eval "$(boot2docker shellinit 2> /dev/null)")
( eval "$(boot2docker shellinit 2> /dev/null)"; )  0.05s user 0.04s system 38% cpu 0.244 total
$ time (export DOCKER_HOST=tcp://192.168.59.103:2376 && export DOCKER_CERT_PATH=${HOME}/.boot2docker/certs/boot2docker-vm && export DOCKER_TLS_VERIFY=1 )
( export DOCKER_HOST=tcp://192.168.59.103:2376 && export  && export ; )  0.00s user 0.00s system 61% cpu 0.001 total
exportのほうがいいね。
IntelliJ をターミナルから開く
これも、一年前くらいの下書きを放出。
sbt経由でIntelliJを起動する方法があったが、sbtの起動がおそいので辛い気持ちがあった。
もう、直接起動すれば良いのではないかということで、以下の関数を bashrc なり zshrc なりに追加する。
idea () {
  /Applications/IntelliJ\ IDEA\ 14.app/Contents/MacOS/idea $(cd "${1}" && /bin/pwd)
}
すると、カレントディレクトリの場合は idea . 、対象のディレクトリにあるプロジェクトを開きたい場合は idea foo/bar とすれば起動できる。
octocatが居るとターミナルで文字がずれる
いつも使っている別のPCで、いろいろと環境を整えていた。 ところが、タブで補完しようとすると、今まで入力していたところが位置も自分ずれてしまう現象が発生した。

原因は、表示されているoctocatであることはすぐに確認できた。 文字幅が2つ分とられているが、そこら辺が原因でなにかおかしくなってるっぽい。 補完のタイミングでずれるので、zshのhook関数などを色々調べてみたがさっぱりわからなかった。
最終的にiTerm2のとあるオプションが原因だったことがわかった。
iTerm2のPreference > Profiles > Text > Double-Width CharactersのTreat ambiguous-width characters as double widthにチェックが入っているとずれるらしい。
まさか、iTerm2だとは思わなかったけど解決できてよかった。

References
IntelliJでSpecs2をs2形式で書くと重い
ここに、同じ症状の方が居た。
やっても改善せず。
ついでに、なぜか一つめに赤線がひかれる。
MatcherResultがかえってるけど、Resultがほしいからエラーっぽい。
ただ、暗黙変換をしてくれてるっぽいのでテストは走る。
これも、telliJが重い原因になってるんじゃないかなぁとかおもう。
ちなみに、${e1: Result} とかtoResultとか書くと赤線はなおる。
Scientific Linux 7.0, 7.1 の Docker ベースイメージを作る
タイトルのまんまですが、ScientificLinux 7.0, 7.1用の Dockerベースイメージを作りました。 一年くらい前に6.5のものを使っ他やり方(Scientific LinuxのDockerイメージを作成する - リジェクトされました)でつくろうとしたらうまく行かなかったのでメモしておこうと思います。
まず、Scientific Linux 7.0/7.1 の VirtualBox イメージを準備しましたが、これはまた別の機会に書こうと思います。 ということで、VMのイメージはこれ(ringo | Atlas by HashiCorp )を使います。
作成したコンテナはこちら(Docker Hub )
Scientific Linux の Docker ベースイメージを作成
Vagrantfile を作成する
まず、ベースとなるVagrantfileを作成します。
特にかわったことはしていません。
vboxに ringo/scientific-linux-7.0 を指定しています。
このイメージを作成する元のスクリプトはこちらです。
あと、 provision に build.sh を指定しています。
VAGRANTFILE_API_VERSION = '2'

Vagrant.configure(VAGRANTFILE_API_VERSION) do |config|
  config.vm.box = 'ringo/scientific-linux-7.0'
  config.vm.network 'private_network', ip: '192.168.33.11'
  config.vm.provision :shell, :path => 'build.sh'
end
Build.sh を作成する
ここにDockerイメージを作成するメインの処理を書きます。
作成するためのコマンドは以前と異なり、 febootstrap コマンドに代わって supermin5 コマンドを使います。
普通に yum install -y supermin をしてしまうと1.4系が入ってしまうので注意。
--prepare オプションでインストールしておきたいパッケージを指定します。
今回は yum のみ。あとは、フォーマットに chroot を指定してビルドするだけ。
# Install supermin
yum update -y && yum install -y supermin5

# Build
supermin5 --prepare yum -o supermin.d && \
  supermin5 --build --format chroot supermin.d -o appliance.d
Locale や I18N を削除
ココらへんを削除するとコンテナのサイズが軽くなります(supermin - fedoraのDockerイメージを作成する - Qiita )
# Remove locales
readonly LOCALE_DIR=${CMD_PATH}/appliance.d/usr/share/locale
mv ${LOCALE_DIR}/en ${LOCALE_DIR}/en_US /tmp && \
  rm -rf ${LOCALE_DIR}/* && \
  mv /tmp/en /tmp/en_US ${LOCALE_DIR}/

# Remove i18ns
readonly I18N_DIR=${CMD_PATH}/appliance.d/usr/share/i18n/locales
mv ${I18N_DIR}/en_US /tmp && \
  rm -rf ${I18N_DIR}/*  && \
  mv /tmp/en_US ${I18N_DIR}/
Tarball の作成
tar で固めて圧縮します。それだけ。
# Create tarball and compress
cd ${CMD_PATH}/appliance.d && tar --create . | xz --best > /vagrant/scientific-linux_${VERSION}_x86_64.tar.xz
コンテナを作成して Docker Hub にプッシュ
# Install the docker
curl -sSL https://get.docker.com/ | sh

# docker import and push
cat /vagrant/scientific-linux_${VERSION}_x86_64.tar.xz | docker import - ringo/scientific:${VERSION} && \
  docker push ringo/scientific:${VERSION}
yum update するとマイナーバージョンが上がってしまう
7.0をわざわざ入れる人は7.0を使いたいというモチベーションがあって入れるわけなので、lockしてあげたかったけど、
やり方がよくわからなかったので、最終的には yum 実行時に --releasever で指定することにした。
色々試した
/etc/yum/vars/releasever に色々書いてみて実験した。
7.0 と書いてみると、7.1 にアップグレードされた。
70 と書いてみると、やはり 7.1 にアップグレードされた。
/etc/yum/vars/slreleasever に色々書いてみて実験した。
7.0 と書いてみると、 /etc/yum/vars/releasever ができて 7 が書かれてた。
そのまま、もう一度 yum update したら 7.1 にあがる。
70 と書いてみると、エラーになってしまう。
他にもなにかやった気がするけど、忘れた。
References
VirtualBox で Scientific Linux 7.0 を起動しようとしたら Guest Additions のインストールに失敗
Scientific Linux 7.0 の Docker用ベースイメージをつくろうと思い、
vagrant up をしたらエラーが発生してうまく行かなかった。人生は厳しい。
おかげで、 /vagrant がマウントされなかった。
環境
$ vagrant --version
Vagrant 1.7.4
$ VBoxManage --version
4.3.28r100309
忙しい人のための
こんなエラーが出たら
The missing package can be probably installed with
yum install kernel-devel-3.10.0-123.el7.x86_64

Building the main Guest Additions module[FAILED]
こうする。
host $ vagrant ssh
vagrant # sudo yum install -y ftp://mirror.switch.ch/pool/4/mirror/scientificlinux/7.0/x86_64/os/Packages/kernel-devel-3.10.0-123.el7.x86_64.rpm
vagrant # exit
host $ vagrant reload
詳細
エラーは以下のような感じ。
Building the VirtualBox Guest Additions kernel modules
The headers for the current running kernel were not found. If the following
module compilation fails then this could be the reason.
The missing package can be probably installed with
yum install kernel-devel-3.10.0-123.el7.x86_64

Building the main Guest Additions module[FAILED]
(Look at /var/log/vboxadd-install.log to find out what went wrong)

...

An error occurred during installation of VirtualBox Guest Additions 4.3.28. Some functionality may not work as intended.
In most cases it is OK that the "Window System drivers" installation failed.
==> default: Checking for guest additions in VM...
    default: No guest additions were detected on the base box for this VM! Guest
    default: additions are required for forwarded ports, shared folders, host only
    default: networking, and more. If SSH fails on this machine, please install
    default: the guest additions and repackage the box to continue.
    default:
    default: This is not an error message; everything may continue to work properly,
    default: in which case you may ignore this message.
==> default: Configuring and enabling network interfaces...
==> default: Mounting shared folders...
    default: /vagrant => /Users/yoshiki_aoki/work/github.com/ringohub/docker-base-image/sl70-base
Failed to mount folders in Linux guest. This is usually because
the "vboxsf" file system is not available. Please verify that
the guest additions are properly installed in the guest and
can work properly. The command attempted was:

mount -t vboxsf -o uid=`id -u vagrant`,gid=`getent group vagrant | cut -d: -f3` vagrant /vagrant
mount -t vboxsf -o uid=`id -u vagrant`,gid=`id -g vagrant` vagrant /vagrant

The error output from the last command was:

/sbin/mount.vboxsf: mounting failed with the error: No such device
どうやら、virtual box guest additions のインストールが失敗してる模様。 気になるログはここらへん。
The missing package can be probably installed with
yum install kernel-devel-3.10.0-123.el7.x86_64

Building the main Guest Additions module[FAILED]
(Look at /var/log/vboxadd-install.log to find out what went wrong)
ここでわかるのは、kernel-devel-3.10.0-123.el7.x86_64 をインストールしなきゃいけなさそうっていうのと、/var/log/vboxadd-install.log のログを見ようってこと。
ログから見てみる。
[root@localhost ~]# cat /var/log/vboxadd-install.log
/tmp/vbox.0/Makefile.include.header:97: *** Error: unable to find the sources of your current Linux kernel. Specify KERN_DIR=<directory> and run Make again.  Stop.
KERN_DIR を指定しろよって言ってる。カーネルのディレクトリをしてしようと思って、みてみる。
[root@localhost vagrant]# ls /usr/src/kernels/
[root@localhost vagrant]#
何もなかった。
ここで、yum install -y kernel-devel でインストールしてしまうと kernel-devel-3.10.0-123.el7.x86_64 が入らない。
なので、ここから rpmを指定バージョンをインストールした。
yum install -y ftp://mirror.switch.ch/pool/4/mirror/scientificlinux/7.0/x86_64/os/Packages/kernel-devel-3.10.0-123.el7.x86_64.rpm
一応確認。
[root@localhost vagrant]# ls /usr/src/kernels/
3.10.0-123.el7.x86_64
KERN_DIR を指定しなきゃだめかなと思ったんだけど、ためにしログアウトして vagrant reload したら無事インストールされた。
...
Installing Virtualbox Guest Additions 4.3.28 - guest version is
Verifying archive integrity... All good.
Uncompressing VirtualBox 4.3.28 Guest Additions for Linux............
VirtualBox Guest Additions installer
Removing installed version 4.3.28 of VirtualBox Guest Additions...
Copying additional installer modules ...
Installing additional modules ...
Removing existing VirtualBox non-DKMS kernel modules[  OK  ]
Building the VirtualBox Guest Additions kernel modules
Building the main Guest Additions module[  OK  ]
Building the shared folder support module[  OK  ]
Building the OpenGL support module[  OK  ]
Doing non-kernel setup of the Guest Additions[  OK  ]
Starting the VirtualBox Guest Additions [  OK  ]
...
References
nodebrew をアップデートしたら exec format error: nodebrew がでた
久しぶりにnodeを最新にあげようと思って、まずnodebrew self updateしたら exec format error: nodebrewがでてきて動かなくなってしまった。が、調べたらすぐ解決できた。よかった。
@Jxck_ GithubのURL変更で動かなくなったやつですかね? https://t.co/MwLExap6K2
— hamaco (@hamaco) 2014, 5月 3nodebrew 0.7.2 以下だと Github の URL 変更問題によって selfupdate がバグってるので `curl -L http://t.co/2CkSCGno88 | perl - selfupdate` していただけるとバージョンアップできます。
— Kazuhito Hokamura (@hokaccha) 2014, 4月 28書いてあるとおり
curl -L http://git.io/nodebrew | perl - selfupdate
を実行したら直った。
rbenv で ruby の環境を整える
忙しい人のためのまとめ
インストール
Macは
brew install rbenv ruby-buildでインストール。git clone https://github.com/sstephenson/rbenv.git ~/.rbenv git clone https://github.com/sstephenson/ruby-build.git ~/.rbenv/plugins/ruby-build apt-get install -y autoconf bison build-essential libssl-dev libyaml-dev libreadline6-dev zlib1g-dev libncurses5-dev libffi-dev libgdbm3 libgdbm-dev.bash/zshrc ファイルに追加。
[[ -d ~/.rbenv ]] && \ export PATH=${HOME}/.rbenv/bin:${PATH} && \ eval "$(rbenv init -)"rubyのインストール
 rbenv install 2.2.2
 rbenv global 2.2.2
 ruby -v
rbenvのインストール
GitHub: sstephenson/rbenvに書いてある通りインストールする 。また、rubyをインストールするためのプラグインである、ruby-buildもインストールする。ruby-buildとrbenvの関係については「rbenv + ruby-build はどうやって動いているのか」を参照。
git clone https://github.com/sstephenson/rbenv.git ~/.rbenv
git clone https://github.com/sstephenson/ruby-build.git ~/.rbenv/plugins/ruby-build
また、ruby-buildの``Suggested build environment''に必要な環境が記述されているので、各システムにあった方法を参照しインストールする。
今回はUbuntuなので下記のコマンドでインストールする。
apt-get install -y autoconf bison build-essential libssl-dev libyaml-dev libreadline6-dev zlib1g-dev libncurses5-dev libffi-dev libgdbm3 libgdbm-dev
Macは brew install rbenv でインストール。
.bashrc、.zshrcもしくは.zshenv等に下記を追加し、パスを通す。
[[ -d ~/.rbenv  ]] && \
  export PATH=${HOME}/.rbenv/bin:${PATH} && \
  eval "$(rbenv init -)"
rubyのインストール
rbenv install -l
でインストール可能なrubyのバージョンが一覧される。特定のバージョンをインストールするコマンドはつぎのようになる。
rbenv install 2.2.2
rubyのインストールが完了したら、利用するrubyのバージョンを指定する。
指定方法はrbenv localとrbenv globalがあり、localは特定のワークスペース(ディレクトリ)でrubyのバージョンを使用する場合に指定する。これは、そのディレクトリにある.ruby-versionファイルを書き換えて管理している。一方、globalはシステム全体で使用するバージョンを指定するコマンドである。基本的に使いたいバージョンをglobalで指定し、プロジェクトによってバージョンを変更したい場合はlocalで指定するのがよい。
rbenv global 2.2.2
また、rbenvでrubyをインストールしたり、gemでパッケージをインストールした後はrbenv rehashを実行しなければならなかった。実行することによって、指定したバージョンのrubyやgemコマンドが.rbenv/shimsに配置される。現在はrbenv本体に取り込まれたため不要である(sstephenson/rbenv/pull/638)。
最後に、指定したバージョンのrubyにパスが通っているか確認しておこう。
$ ruby -v
ruby 2.1.2p95 (2014-05-08 revision 45877) [x86_64-linux]
$ which ruby
~/.rbenv/shims/ruby
$ which gem
~/.rbenv/shims/gem
Errors
The Ruby openssl extension was not compiled. Missing the OpenSSL lib?
Downloading ruby-2.2.2.tar.gz...
-> http://dqw8nmjcqpjn7.cloudfront.net/5ffc0f317e429e6b29d4a98ac521c3ce65481bfd22a8cf845fa02a7b113d9b44
Installing ruby-2.2.2...

BUILD FAILED (Ubuntu 14.04 using ruby-build 20150519-3-ge932d47)

Inspect or clean up the working tree at /tmp/ruby-build.20150529121544.8737
Results logged to /tmp/ruby-build.20150529121544.8737.log

Last 10 log lines:
                              rake 10.4.2
                              rdoc 4.2.0
skip installing bundle gems because of lacking zlib
...
The Ruby openssl extension was not compiled. Missing the OpenSSL lib?
opensslのなにかが不足してるっぽいのでインストールする。 ruby-buildの``Suggested build environment''に必要な環境が記述されていた。
apt-get install -y autoconf bison build-essential libssl-dev libyaml-dev libreadline6-dev zlib1g-dev libncurses5-dev libffi-dev libgdbm3 libgdbm-dev
References
Dockerコンテナのようなランダムに名前を生成する`name`コマンドを作った(?)
“Dockerコンテナのような"とタイトルには書いたが、まんまDockerで使われているLibraryをコマンド化しただけのもの。果たして、作ったと言っていいのか疑わしいレベル。
イマ作っているアプリケーションでランダムな名前ユーザのディレクトリを幾つか作る必要があった。Alice, Bob, Carol, Daveと作っていっても良かったんだけど、味気がない。Dockerコンテナはランダムに名前つけてたということを思い出したため、これを利用しようと思った。
結果として、Dockerコンテナのおもしろい名前で書かれていることが全てで、フラグつけてラップしただけのコマンドである(もうすでにありそう)。
リポジトリはGitHub: ringohub/nameで公開してます。
Install
go get github.com/ringohub/name
Usage
$ name -h
Usage of name:
  -n=1: Number of generate names
$ name
jolly_kirch
$ name -n 5
sleepy_pare
tender_carson
kickass_bartik
happy_meitner
agitated_pike
References
React.jsでES6の文法を使って defaultProps などを設定する
環境
| Tools | Version |
|---|---|
| react-tools | 0.13.1 |
| jsx | 0.12.2 |
| react.js | 0.13.1 |
| JSXTransformer.js | 0.13.1 |
react-toolsをnpmでインストールし、jsxに--harmonyオプションを付けてコンパイルした。
npm install -g react-tools
jsx --harmony -w src build
方法
var Hello = React.createClass({
  getDefaultProps: function() {
    return {name: "Default Props"};
  },

  render: function() {
    return <div>Hello {this.props.name}</div>;
  }
});
を
class Hello extends React.Component {
  constructor(props) {
    super(props);
    console.log(props);
    console.log(this.props);
    this.state = {name: this.props.initialName};
  }

  render() {
    return <div>Hello {this.state.name}</div>;
  }
}
Hello.defaultProps = {initialName: "Default Props"};
にする。
試行錯誤
普通にdefaultPropsを記述すると、
var Hello = React.createClass({
  getDefaultProps: function() {
    return {name: "Default Props"};
  },

  render: function() {
    return <div>Hello {this.props.name}</div>;
  }
});
となる。 これを、ES6で記述すると、
class Hello extends React.Component {
  getDefaultProps() {
    return  {name: "Default Props"};
  }

  render() {
    return <div>Hello {this.props.name}</div>;
  }
}
となるとおもいきや、defaultPropsが全然効かない。
Reusable Componentsのドキュメントを読むと、propTypesとdefaultPropsやpropTypesはどうやら書き方がちょっと違うらしい。
The API is similar to React.createClass with the exception of getInitialState. Instead of providing a separate getInitialState method, you set up your own state property in the constructor.
Another difference is that propTypes and defaultProps are defined as properties on the constructor instead of in the class body.
サンプルを見ながら書き換える。
export class Hello extends React.Component {
  constructor(props) {
    super(props);
    console.log(props);
    console.log(this.props);
    this.state = {name: this.props.initialName};
  }

  render() {
    return <div>Hello {this.props.name}</div>;
  }
}
Hello.defaultProps = {initialName: "Default Props"};
コンパイルは通るが、ブラウザで表示すると以下の様なエラーが出る。
Uncaught Error: Parse Error: Line 3: Illegal export declaration
    at file:///Users/yoshiki_aoki/work/react-tutorial/build/alone.js:3:undefined
export var ____Classm=React.Com ...
^
ちなみに、React.jsのページにあるJSX Compilerで、ドキュメントに載っているコードをコンパイルすると同じエラーが出る。
試しにexportをはずすと、エラーは発生しないがデフォルト値がセットされていない。
これは、別の箇所が原因でrenderのpropsをstateに変更するのを忘れていた事が原因だった。
class Hello extends React.Component {
  constructor(props) {
    super(props);
    console.log(props);
    console.log(this.props);
    this.state = {name: this.props.initialName};
  }

  render() {
    return <div>Hello {this.state.name}</div>;
  }
}
Hello.defaultProps = {initialName: "Default Props"};
これで無事表示された。
References
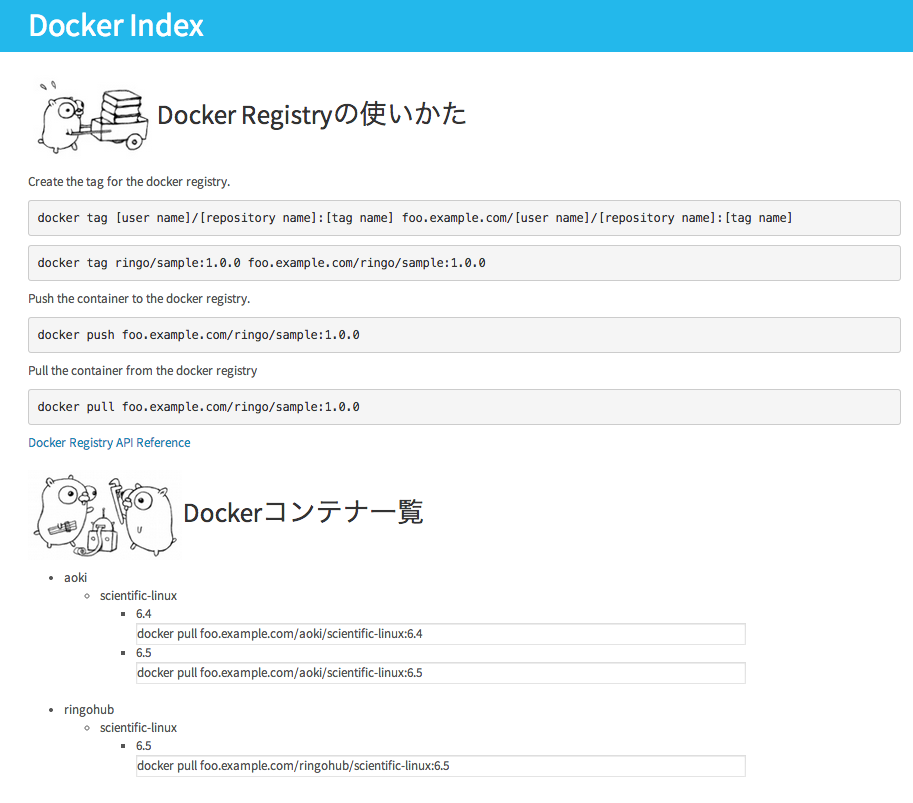
DockerRegistryのコンテナ一覧を見るDockerIndexをつくった
先日、会社のエンジニア全員が参加するハッカソンでDocker Indexというアプリを作りました。
名前はさておき、Docker Index とは、Docker Registoryに登録されているコンテナを一覧表示するWebApplicationです。 Docker RegistoryはDocker Hub(のようなもの)を自分のサーバにたてられようなものです。
ただ、WebUIは一切用意してくれていないので、 会社でみんながDocker Registoryに作成したコンテナをpushしてくれていても、 どんなコンテナが存在するのか確認する術がありませんでした。
これが、作成しようと思った動機。
使用言語、フレームワーク
このハッカソンのルール(?)は、普段業務であまり使っていない言語・フレームワークを選択しよう!というもの。 そこで、何にしようかと考えたところ、DockerもGoで書かれているし、Goで書くということにしました。
フレームワークは、普段業務ではPlay2/Scalaを使っているため、雰囲気が似ているというRevelを使ってみようと思い採用しました。
そして、どうせならやっぱりDockerコンテナで動かしたいよね。
ということで、ゴールは“DockerコンテナでDocker Registoryに保存されているコンテナを一覧表示するWebUIを作る”というものを設定しました。
4, 5時間で、初めての言語、初めてのフレームワークということなので、このくらいの課題でちょうどいいかなと思います。 ハッカソンは何か動くものを作るのが目標なので。
つくってみた
とりあえず、ローカルで環境をつくりgo/revelの環境をつくり、hello worldを済ませました。
最初IntelliJでやっていたんだけど、微妙な感じだったので(うまく設定できてない?)atomでやりました。 入れたパッケージは多分こんな感じ
- typester/atom-gocode
- joefitzgerald/go-plus
ドキュメントとかは適当にココらへんを読んだり、Golangテーブルでハッカソンしてる人に聞いたりしてしました。
内部的にはディレクトリの内容をみて、一覧しているだけなので大したことはしてません。
しかも、パッケージの切り方がよくわからず、全てコントローラーに突っ込んであります(※ハッカソンです)。
そして、できたのがこんなかんじ。
問題
パッケージの切り方がよくわからなかった
なんか、単純にpackageを/できって、ディレクトリ構造と合わせてみてもならなかったので、時間の都合上後回しにしました。
docker build しようとするとbuildableじゃないと怒られる
docker buildしたときにbuildableじゃないと言われ、途中で止まってしまう問題が発生しました。
多分、実行用にいろいろしなきゃいけないんだろうなぁと思いながら、時間がないのでとりあえずrevel runで動く状態で放置してました。
Step 4 : RUN go get github.com/ringohub/docker-index
 ---> Running in cf9d1b96d14f
package github.com/ringohub/docker-index
    imports github.com/ringohub/docker-index
    imports github.com/ringohub/docker-index: no buildable Go source files in /gopath/src/github.com/ringohub/docker-index
リターンコードが0じゃないと途中で止まってしまうっぽかったので、
対症療法として、;echo ''を実行しリターンコードを誤魔化したりしてみました。
どなたか、正しいやり方教えてください。
感想
- 半日で何かを作るのは時間的に難しいかった。
- でも、使ったこと無い言語やフレームワークに挑戦するのは楽しい!
- ハッカソンテーマが「出会い」ということをすっかり忘れていて、発表が始まってから気づいた
- gopherがかわいくみえてきた(人形欲しい)
来年もまたがんばります。
成果物
今回作った、revelアプリやDockerfileはこちらにおいてあります。
突っ込みどころ満載なので、プルリクし放題です。
golangerたちのプルリクを頂けると勉強になるとおもうのでお待ちしております!
dwanGoも開催されます!
Macのdockerを1.0にアップグレードする
まだ、docker 1.0になってからアップグレードしてないMacがあったので、アップグレードしました。
古いboot2dockerのアンインストール
次の手順でboot2dockerをインストールしていた人はこの手順を行う必要があります。
# これでインストールしてた人は一度消す必要がある
$ brew tap homebrew/binary
$ brew install boot2docker docker
1.0からbrew caskでインストールできるようになりました。
逆に、普通にbrewではインストールできないようになりました。
そのため、一度boot2dockerをアンインストールします。
boot2dockerが起動していたらstopします。
$ boot2docker stop
[2014-06-15 13:50:35] Shutting down boot2docker-vm...
使っていたtiny core Linuxを削除します。
$ boot2docker delete
boot2dockerをアンインストールします。さらば。
$ brew uninstall boot2docker docker
Uninstalling /usr/local/Cellar/boot2docker/0.9.1...
brew caskでboot2dockerをインストール
まずは、updateしましょう。
$ brew update
caskが入っていない場合は、インストールします。
$ brew tap phinze/homebrew-cask
$ brew install brew-cask
入っている場合はupgrade。
$ brew upgrade brew-cask
あとはインストールするだけ!
brew cask install boot2docker
==> Downloading https://github.com/boot2docker/osx-installer/releases/download/v1.0.0/Boot2Docker-1.0.0.pkg
######################################################################## 100.0%
==> Running installer for boot2docker; your password may be necessary.
Password:
==> installer: Package name is Boot2Docker for Mac OS X
==> installer: Upgrading at base path /
==> installer: The upgrade was successful.
 boot2docker installed to '/opt/homebrew-cask/Caskroom/boot2docker/1.0.0' (135M)
以前のboot2dockerと比べてもコマンドが増えてる。。
# old
$ boot2docker
Usage /usr/local/bin/boot2docker {init|start|up|save|pause|stop|restart|status|info|delete|ssh|download}
# new
$ boot2docker
Usage: boot2docker [<options>] {help|init|up|ssh|save|down|poweroff|reset|restart|config|status|info|ip|delete|download|version} [<args>]
動作確認
[IP Address]の部分は適当なものを入れてください。
$ boot2docker init
$ boot2docker up
$ export DOCKER_HOST=tcp://[IP Address]:2375
$ boot2docker ssh
Warning: Permanently added '[localhost]:2022' (RSA) to the list of known hosts.
                        ##        .
                  ## ## ##       ==
               ## ## ## ##      ===
           /""""""""""""""""\___/ ===
      ~~~ {~~ ~~~~ ~~~ ~~~~ ~~ ~ /  ===- ~~~
           \______ o          __/
             \    \        __/
              \____\______/
 _                 _   ____     _            _
| |__   ___   ___ | |_|___ \ __| | ___   ___| | _____ _ __
| '_ \ / _ \ / _ \| __| __) / _` |/ _ \ / __| |/ / _ \ '__|
| |_) | (_) | (_) | |_ / __/ (_| | (_) | (__|   <  __/ |
|_.__/ \___/ \___/ \__|_____\__,_|\___/ \___|_|\_\___|_|
boot2docker: 1.0.0
             master : 16013ee - Mon Jun  9 16:33:25 UTC 2014
無事upgradeできました。Moby Dockかわいい。
$ docker version
Client version: 1.0.0
Client API version: 1.12
Go version (client): go1.2.1
Git commit (client): 63fe64c
Server version: 1.0.0
Server API version: 1.12
Go version (server): go1.2.1
Git commit (server): 63fe64c
出会ったエラー
no such file or directory
DOCKER_HOSTをExportしてないと出ます。
$ docker images
Get http:///var/run/docker.sock/v1.12/images/json: dial unix /var/run/docker.sock: no such file or directory
DOCKER_HOSTをExportしましょう。
export DOCKER_HOST=tcp://[IP Address]:2375
permission denied
悩んだ。。
VPNにつないでいるとおかしいっぽいです(◞‸◟)。 VPNを切りましょう。VPNに接続したままやる方法はよくわかりません。
$ docker images
Get http://[IP Address]:2375/v1.12/images/json: dial tcp [IP Address]:2375: permission denied
参考
Scientific LinuxのDockerイメージを作成する
Docker Indexに公式に提供されている、 Scientific Linuxのベースイメージがなかったので、 自分で作ってみました。
成果物はこちら。
- Scientific Linuxのベースイメージ: ringo/scientific
- ベースイメージを作成するのに利用したスクリプト: github.com/ringohub/docker-base-image
対象のVMを作成する
まず、Scientific Linux 6.5のDocker用ベースイメージを作成したい場合、 Scientific Linux 6.5のVMを作成します。
作り方はなんでもいいですが、Packerを使って作成する手順をまとめたのがこちらです。
以降の作業はこのVMの中で行います。
Dockerのインストール
まず、ベースイメージを作るためにDocekrをインストールします。
yumにEPELリポジトリを追加
sudo rpm -ivh http://ftp.riken.jp/Linux/fedora/epel/6/x86_64/epel-release-6-8.noarch.rpm
sudo yum -y update
もう、EPELリポジトリ以外はアップデート済みの場合は、
sudo yum -y update epel-releaseでもいいです。
Dockerのインストール
Dockerのインストールは普通にyumで行うだけ。簡単!
sudo yum -y install docker-io
Dockerベースイメージの作成
febootstrapというツールを使って作成します。
(詳しく知らないけど、debootstrapみたいなもの??)
作成用のシェルスクリプトを書きます。 名前は適当にsl65.shとかにしました。
#!/bin/bash

MIRROR_URL="http://ftp.riken.jp/Linux/scientific/6.5/x86_64/os/"
MIRROR_URL_UPDATES="http://ftp.riken.jp/Linux/scientific/6.5/x86_64/updates/security/"

yum install -y febootstrap xz

febootstrap -i bash -i coreutils -i tar -i bzip2 -i gzip -i vim-minimal -i wget -i patch -i diffutils -i iproute -i yum scientific scientific65  $MIRROR_URL -u $MIRROR_URL_UPDATES
touch scientific65/etc/resolv.conf
touch scientific65/sbin/init

tar --numeric-owner -Jcpf scientific-65.tar.xz -C scientific65 .
あとは、これを実行するだけ。
sudo ./sl65.sh
動作確認
シェルスクリプトを実行すると次のようなファイルが出来てます。
[vagrant@localhost ~]$ ls -l
total 51960
-rw-rw-r--  1 vagrant vagrant 53195204 Jun  1 15:10 scientific-65.tar.xz
dr-xr-xr-x 21 root    root        4096 Jun  1 15:07 scientific65
-rwxr-xr-x  1 vagrant vagrant      595 Jun  1 15:06 sl65.sh
こいつを、dockerにインポートします。
まず、dockerを起動。
sudo service docker start
次に、インポート。
リポジトリをlocal/scientificにして、tagを6.5にしました。
cat scientific-65.tar.xz | sudo docker import - local/scientific:6.5
imageを確認。
[vagrant@localhost ~]$ sudo docker images
REPOSITORY          TAG                 IMAGE ID            CREATED             VIRTUAL SIZE
local/scientific    6.5                 ad81296d21b0        13 minutes ago      309.6 MB
docker runしてみます。
[vagrant@localhost ~]$ sudo docker run local/scientific:6.5 cat /etc/system-release
Scientific Linux release 6.5 (Carbon)
よさそう。
Docker Indexにpushする
コマンドメモしか保存していなかったので、 ここから先はScientific Linux 6.4で実行ログを収集しました。
まず、実行している(いた)コンテナ一覧をみます。
[vagrant@localhost ~]$ sudo docker ps -a
CONTAINER ID        IMAGE                  COMMAND                CREATED             STATUS                      PORTS               NAMES
a266aa1f5c10        local/scientific:6.4   cat /etc/system-rele   37 minutes ago      Exited (0) 37 minutes ago                       determined_feynman
このコンテナをコミットします。
- a266aa1f5c10はpsで確認したCONTAINER ID
- ringo/scientificはDocker Indexで作成した自分のリポジトリ
- :の後ろにタグ
[vagrant@localhost ~]$ sudo docker commit a266aa1f5c10 ringo/scientific:6.4
0bdd7adac72c6d381e0fe56320252ffbfd39f1a965964115c598f2153fd7a9a8
ringo/scientificができました。
[vagrant@localhost ~]$ sudo docker images
REPOSITORY          TAG                 IMAGE ID            CREATED             VIRTUAL SIZE
ringo/scientific    6.4                 0bdd7adac72c        10 seconds ago      308.9 MB
local/scientific    6.4                 c5cb7eb15e7e        38 minutes ago      308.9 MB
Push しましょう!!
[vagrant@localhost ~]$ sudo docker push ringo/scientific
The push refers to a repository [ringo/scientific] (len: 1)
Sending image list

Please login prior to push:
Username: ringo
Password:
Email:
Login Succeeded
The push refers to a repository [ringo/scientific] (len: 1)
Sending image list
Pushing repository ringo/scientific (1 tags)
c5cb7eb15e7e: Image successfully pushed
0bdd7adac72c: Image successfully pushed
Pushing tag for rev [0bdd7adac72c] on {https://registry-1.docker.io/v1/repositories/ringo/scientific/tags/6.4}
ベースイメージを使ってみる
まず、pullします。
[vagrant@localhost ~]$ sudo docker pull ringo/scientific
Pulling repository ringo/scientific
0bdd7adac72c: Download complete
1a2eb0bba51b: Download complete
c5cb7eb15e7e: Download complete
ae0b1be0b6ae: Download complete
[vagrant@localhost ~]$ sudo docker images
REPOSITORY          TAG                 IMAGE ID            CREATED             VIRTUAL SIZE
ringo/scientific    6.4                 0bdd7adac72c        About an hour ago   308.9 MB
ringo/scientific    6.5                 1a2eb0bba51b        10 days ago         322.8 MB
つぎに、runします。
[vagrant@localhost ~]$ sudo docker run -i -t ringo/scientific:6.5 cat /etc/system-release
Scientific Linux release 6.5 (Carbon)
動いたー。
最後に
Scientific Linuxのベースイメージはringo/scientificにおいてあります。
また、ベースイメージを作成するのに利用した、スクリプトはgithub.com/ringohub/docker-base-imageにおいてあります。 よかったら、参考にどうぞ。
おわり!
参考
Packer で Scientific Linux 6.5 の base box を作成してみる
VagrantでScientificLinux 6.5を使いたかったんだけど、 vagrantbox.esには明示的に6.5って書いてあるboxは無かった。 (Scientific Linux 6はあったけど) なので、ScientificLinux 6.5 のvagrant用base boxをpackerで作成してみた。
成果物のtemplateはGitHub: ringohub/packer-template feature/scientifi-6.5にあります。
成果物のtemplateは[GitHub: packer-templates/develop]にあります(shiguredo/packer-templates developにマージされました。ありがとうございます)。
事前準備
- Packer で Scientific Linux 6.1 の Box を作成してみるに書いてあるように、shiguredo/packer-templatesを
forkする git cloneする- 適当に
centos-6.5なんかをコピーしてscientific-6.5を作成する
template.jsonの編集
template.jsonにかかれている内容を変更します。 主に、osのイメージ名やDL元のURL,checksumのハッシュ値などを変更しました。 vmwareは使う予定ないけど、templateに入っていたのでついでに変更。
diff --git a/scientific-6.5/scripts/vagrant.sh b/scientific-6.5/scripts/vagrant.sh
index 76fb7bd..3b39389 100644
--- a/scientific-6.5/scripts/vagrant.sh
+++ b/scientific-6.5/scripts/vagrant.sh
@@ -1,3 +1,5 @@
+#!/bin/sh
+
 date > /etc/vagrant_box_build_time

 mkdir -pm 700 /home/vagrant/.ssh
diff --git a/scientific-6.5/template.json b/scientific-6.5/template.json
index 2ddbe77..e428542 100644
--- a/scientific-6.5/template.json
+++ b/scientific-6.5/template.json
@@ -28,10 +28,10 @@
       "type": "vagrant",
       "override": {
         "virtualbox": {
-          "output": "centos-6-5-x64-virtualbox.box"
+          "output": "scientific-6-5-x64-virtualbox.box"
         },
         "vmware": {
-          "output": "centos-6-5-x64-vmware.box"
+          "output": "scientific-6-5-x64-vmware.box"
         }
       }
     }
@@ -46,9 +46,9 @@
       "disk_size": 40520,
       "guest_os_type": "RedHat_64",
       "http_directory": "http",
-      "iso_checksum": "f21a71e8e31df73297bdd1ccd4a64a36831284bd",
+      "iso_checksum": "a95e182f6ed14a4fb36e448d6eb19a6a59a34778",
       "iso_checksum_type": "sha1",
-      "iso_url": "http://ftp.iij.ad.jp/pub/linux/centos/6.5/isos/x86_64/CentOS-6.5-x86_64-minimal.iso",
+      "iso_url": "http://ftp.riken.jp/Linux/scientific/6.5/x86_64/iso/SL-65-x86_64-2014-01-27-Install-DVD.iso",
       "ssh_username": "vagrant",
       "ssh_password": "vagrant",
       "ssh_port": 22,
@@ -68,11 +68,11 @@
       ],
       "boot_wait": "10s",
       "disk_size": 40520,
-      "guest_os_type": "centos-64",
+      "guest_os_type": "RedHat_64",
       "http_directory": "http",
-      "iso_checksum": "f21a71e8e31df73297bdd1ccd4a64a36831284bd",
+      "iso_checksum": "a95e182f6ed14a4fb36e448d6eb19a6a59a34778",
       "iso_checksum_type": "sha1",
-      "iso_url": "http://ftp.iij.ad.jp/pub/linux/centos/6.5/isos/x86_64/CentOS-6.5-x86_64-minimal.iso",
+      "iso_url": "http://ftp.riken.jp/Linux/scientific/6.5/x86_64/iso/SL-65-x86_64-2014-01-27-Install-DVD.iso",
       "ssh_username": "vagrant",
       "ssh_password": "vagrant",
       "ssh_port": 22,
@@ -87,3 +87,4 @@
     }
   ]
 }
+
- ちなみに、
guest_os_typeの一覧はVBoxManage list ostypesで一覧できます。 - イメージのおいてあるサーバはrikenにしました。
packerでbase boxをbuildする
packerでbase boxを作成します。
$ packer build -only=virtualbox-iso template.json
ビルドすると、ディレクトリにoutputで指定したscientific-6-5-x64-virtualbox.boxが作成されています。
vagrantで稼働確認
vagrant add
作成されたboxをaddしましょう。
$ vagrant box add sl6.5 scientific-6-5-x64-virtualbox.box
==> box: Adding box 'sl6.5' (v0) for provider:
    box: Downloading: file:///Users/ringo/work/packer-templates/scientific-6.5/scientific-6-5-x64-virtualbox.box
==> box: Successfully added box 'sl6.5' (v0) for 'virtualbox'!
追加されたか確認。
$ vagrant box list
opscode-ubuntu-12.04 (virtualbox, 0)
sl6.5                (virtualbox, 0)
ubuntu14.04          (virtualbox, 0)
よしよし。
vagrnat init
適当なところでvagrant initして、適当にVagrantfileを編集します。
# -*- mode: ruby -*-
# vi: set ft=ruby :

VAGRANTFILE_API_VERSION = "2"

Vagrant.configure(VAGRANTFILE_API_VERSION) do |config|
  config.vm.box = "sl6.5"
  config.vm.network "private_network", ip: "192.168.33.10"
end
vagrant up
upしてみましょう。
$ vagrant up
Bringing machine 'default' up with 'virtualbox' provider...
==> default: Importing base box 'sl6.5'...
==> default: Matching MAC address for NAT networking...
==> default: Setting the name of the VM: sl_default_1401725308602_87916
==> default: Clearing any previously set network interfaces...
==> default: Preparing network interfaces based on configuration...
    default: Adapter 1: nat
    default: Adapter 2: hostonly
==> default: Forwarding ports...
    default: 22 => 2222 (adapter 1)
==> default: Booting VM...
==> default: Waiting for machine to boot. This may take a few minutes...
    default: SSH address: 127.0.0.1:2222
    default: SSH username: vagrant
    default: SSH auth method: private key
    default: Warning: Connection timeout. Retrying...
==> default: Machine booted and ready!
GuestAdditions 4.3.10 running --- OK.
==> default: Checking for guest additions in VM...
==> default: Configuring and enabling network interfaces...
==> default: Mounting shared folders...
    default: /vagrant => /Users/ringo/work/sl
いけた。
$ vagrant ssh
Last login: Tue Jun  3 00:56:37 2014 from 10.0.2.2
[vagrant@localhost ~]$ cat /etc/system-release
Scientific Linux release 6.5 (Carbon)
完成!
まとめ
packerを使って、OSのイメージからvagrant boxを作成してみました。 意外に、簡単にできるとおもいきや、下に書いてあるようなエラーでハマってたりしました。 boxは作れてupもできるんだけど、デフォルトでSSH鍵認証が出来ない状態でした。 とりあえず、作成できて良かったです。
ここから下は、興味がある人、同じ罠にはまってる人は御覧ください。 おわり。
エラー: vagrant upするとConnection timeoutする件
事象
「よしboxできた」と思ってvagrant upをしてみると、Connection timeoutがでた。
なんか、この時点でSSHっぽい予感がしてた。
$ vagrant up
Bringing machine 'default' up with 'virtualbox' provider...
==> default: Importing base box 'sl6.5'...
==> default: Matching MAC address for NAT networking...
==> default: Clearing any previously set network interfaces...
==> default: Preparing network interfaces based on configuration...
    default: Adapter 1: nat
    default: Adapter 2: hostonly
==> default: Forwarding ports...
  1 # -*- mode: ruby -*-
    default: 22 => 2222 (adapter 1)
==> default: Booting VM...
==> default: Waiting for machine to boot. This may take a few minutes...
    default: SSH address: 127.0.0.1:2222
    default: SSH username: vagrant
    default: SSH auth method: private key
    default: Warning: Connection timeout. Retrying...
    default: Warning: Authentication failure. Retrying...
    default: Warning: Authentication failure. Retrying...
    default: Warning: Authentication failure. Retrying...
    default: Warning: Authentication failure. Retrying...
    default: Warning: Authentication failure. Retrying...
    default: Warning: Authentication failure. Retrying...
    default: Warning: Authentication failure. Retrying...
    default: Warning: Authentication failure. Retrying...
    default: Warning: Authentication failure. Retrying...
    default: Warning: Authentication failure. Retrying...
    default: Warning: Authentication failure. Retrying...
    default: Warning: Authentication failure. Retrying...
    default: Warning: Authentication failure. Retrying...
    default: Warning: Authentication failure. Retrying...
    default: Warning: Authentication failure. Retrying...
    default: Warning: Authentication failure. Retrying...
    default: Warning: Authentication failure. Retrying...
    default: Warning: Authentication failure. Retrying...
    default: Warning: Authentication failure. Retrying...
    default: Warning: Authentication failure. Retrying...
    default: Warning: Authentication failure. Retrying...
    default: Warning: Authentication failure. Retrying...
    default: Warning: Authentication failure. Retrying...
    default: Warning: Authentication failure. Retrying...
    default: Warning: Authentication failure. Retrying...
    default: Warning: Authentication failure. Retrying...
    default: Warning: Authentication failure. Retrying...
    default: Warning: Authentication failure. Retrying...
Timed out while waiting for the machine to boot. This means that
Vagrant was unable to communicate with the guest machine within
the configured ("config.vm.boot_timeout" value) time period.

If you look above, you should be able to see the error(s) that
Vagrant had when attempting to connect to the machine. These errors
are usually good hints as to what may be wrong.

If you're using a custom box, make sure that networking is properly
working and you're able to connect to the machine. It is a common
problem that networking isn't setup properly in these boxes.
Verify that authentication configurations are also setup properly,
as well.

If the box appears to be booting properly, you may want to increase
the timeout ("config.vm.boot_timeout") value.
試しに、vagrant sshでログインしてみると、パスワードを聞かれた。
予定ではSSHの鍵認証が行われ、すっとログインできるはずだった。
とりあえず、パスワードでログインして、authorized_keysの中を見てみると。。。
$ cat authorized_keys
<!DOCTYPE HTML PUBLIC "-//IETF//DTD HTML 2.0//EN">
<html><head>
<title>400 Bad Request</title>
</head><body>
<h1>Bad Request</h1>
<p>Your browser sent a request that this server could not understand.<br />
</p>
</body></html>
Bad Requestが入ってた(◞‸◟)
原因
コピーして持ってきたtemplateの中にscripts/vagrant.shというシェルスクリプトがある。
date > /etc/vagrant_box_build_time

mkdir -pm 700 /home/vagrant/.ssh
curl -L https://raw.github.com/mitchellh/vagrant/master/keys/vagrant.pub -o /home/vagrant/.ssh/authorized_keys
chmod 0600 /home/vagrant/.ssh/authorized_keys
chown -R vagrant:vagrant /home/vagrant/.ssh
このファイルの中で、実行されているcurlがBad RequestのHTMLをDLしていた。
しかし、このcurlで叩いているURLは古く、ブラウザでアクセスすると、
https://raw.githubusercontent.com/mitchellh/vagrant/master/keys/vagrant.pubにリダイレクトされる。
GitHubのrawリソースを示すURLが変わったとのこと。
ということで、次のように変更したら無事鍵が登録された。
diff --git a/scientific-6.5/scripts/vagrant.sh b/scientific-6.5/scripts/vagrant.sh
index 3b39389..658a8d6 100644
--- a/scientific-6.5/scripts/vagrant.sh
+++ b/scientific-6.5/scripts/vagrant.sh
@@ -3,6 +3,6 @@
 date > /etc/vagrant_box_build_time

 mkdir -pm 700 /home/vagrant/.ssh
-curl -L https://raw.github.com/mitchellh/vagrant/master/keys/vagrant.pub -o /home/vagrant/.ssh/authorized_keys
+curl -L https://raw.githubusercontent.com/mitchellh/vagrant/master/keys/vagrant.pub -o /home/vagrant/.ssh/authorized_keys
 chmod 0600 /home/vagrant/.ssh/authorized_keys
おまけ
Mac OSX 10.9 Mavericks でcurlを実行した時と、
Scientific Linux 6.5 でcurlを実行した時の結果を比較してみた。
OSXはBSD系のコマンドが入っているので、GNU系のScientific Linuxとは挙動が違うのかもしれない。
まず、OSX
$ curl --version
curl 7.30.0 (x86_64-apple-darwin13.0) libcurl/7.30.0 SecureTransport zlib/1.2.5
Protocols: dict file ftp ftps gopher http https imap imaps ldap ldaps pop3 pop3s rtsp smtp smtps telnet tftp
Features: AsynchDNS GSS-Negotiate IPv6 Largefile NTLM NTLM_WB SSL libz
$ curl -I -L https://raw.github.com/mitchellh/vagrant/master/keys/vagrant.pub
HTTP/1.1 301 Moved Permanently
Date: Mon, 02 Jun 2014 16:46:59 GMT
Server: Apache
Location: https://raw.githubusercontent.com/mitchellh/vagrant/master/keys/vagrant.pub
Accept-Ranges: bytes
Via: 1.1 varnish
Age: 0
X-Served-By: cache-ty66-TYO
X-Cache: MISS
X-Cache-Hits: 0
Vary: Accept-Encoding

HTTP/1.1 200 OK
Date: Mon, 02 Jun 2014 16:46:59 GMT
Server: Apache
Content-Security-Policy: default-src 'none'
Access-Control-Allow-Origin: https://render.githubusercontent.com
X-XSS-Protection: 1; mode=block
X-Frame-Options: deny
X-Content-Type-Options: nosniff
Strict-Transport-Security: max-age=31536000
ETag: "18a9c00fd56d378c4cea4ee6e89018df8b41f9fa"
Content-Type: text/plain; charset=utf-8
Cache-Control: max-age=300
Content-Length: 409
Accept-Ranges: bytes
Via: 1.1 varnish
X-Served-By: cache-ty68-TYO
X-Cache: MISS
X-Cache-Hits: 0
Vary: Authorization,Accept-Encoding
Expires: Mon, 02 Jun 2014 16:51:59 GMT
Source-Age: 0
つぎに、Scientific Linux
[vagrant@localhost ~]$ curl --version
curl 7.19.7 (x86_64-redhat-linux-gnu) libcurl/7.19.7 NSS/3.14.0.0 zlib/1.2.3 libidn/1.18 libssh2/1.4.2
Protocols: tftp ftp telnet dict ldap ldaps http file https ftps scp sftp
Features: GSS-Negotiate IDN IPv6 Largefile NTLM SSL libz
[vagrant@localhost ~]$ curl -I -L https://raw.github.com/mitchellh/vagrant/master/keys/vagrant.pub
HTTP/1.1 301 Moved Permanently
Date: Mon, 02 Jun 2014 16:45:49 GMT
Server: Apache
Location: https://raw.githubusercontent.com/mitchellh/vagrant/master/keys/vagrant.pub
Accept-Ranges: bytes
Via: 1.1 varnish
Age: 0
X-Served-By: cache-ty68-TYO
X-Cache: MISS
X-Cache-Hits: 0
Vary: Accept-Encoding

HTTP/1.1 400 Bad Request
Date: Mon, 02 Jun 2014 16:45:54 GMT
Server: Apache
Connection: close
Content-Type: text/html; charset=iso-8859-1
どちらも-Lでリダイレクト先に飛んでいるが、なぜかSLの方はBadRequest。
ふーむ。
参考
- Packer で Scientific Linux 6.1 の Box を作成してみる
- PackerでVagrant Boxを作成する際のトラブルシューティング
- eigo's packer template(GitHubにあげてもらいました! 追記 at 2014/07/07)
knife solo cook コマンドの誤爆を防ぐ
knife solo cookコマンドはchefリポジトリ内で実行しないと、失敗するだけでなく、
余計なnodeファイルなどが作成されてしまう。 ただ、エラーで終了してくれればいいんだけど。。。
しばらく、失敗している原因(実行するディレクトリが違う事)に気づかいない場合も多々ある。 Recipeやnodeファイルを無駄に見なおしたり。。。
ということで、 対症療法ですがaliasでなんとかしてみました。
方法
以下の関数とaliasを.zshrcや.bashrcに設定するだけです。
function knife_solo_check() {
  if [ "$1" = 'solo' ] && [ "$2" = 'cook' ] && [ ! -d .chef ]; then
    \echo -e '\033[0;31mERROR:\033[0;39m Not chef repository directory.'
  else
    \knife $@
  fi
}
alias knife=knife_solo_check
内容は単純で、knifeコマンドの引数がsolo cookであるとき且つ、
実行した場所に.chefディレクトリが存在しない場合にだけエラーを表示します。
もしかしたら、こういうことにならない方法がすでにあるかもしれないし、 もっといい方法があるかもしれない。。 あったら教えて下さい。